
Note: As of summer 2020 I no longer use Dubsado as my CRM, to learn more about what program I use now, see this post.
Automation.
Workflows.
Canned emails.
It all can sound so robotic, cold, and impersonal. Not the way you want to run your design or copywriting studio, right?
You want to give each lead and client a high-touch experience, one that creates more high-quality word of mouth referrals. But at the same time, you don’t have space to write a custom and personalized email to each and every lead.
The good news? You don’t need a fully automated workflow or write each lead a compelling email from scratch. In fact, you can have the best of both worlds — automation and high-touch custom-feeling communication.
By using a simple, semi-automated workflow in Dubsado you can begin to nurture and engage with your leads.
All you need to do is tick one small box, “Approve before sending.”
Technically it’s called “Require approval before completing this action,” but I tend to just call it “Approve Before Sending”. According to Dubsado, “Approving before sending gives you complete control over when an action runs, allowing you to make edits to the action or determine whether or not you want it to run. If you don’t approve an action right away, when it comes time for that action to trigger, you will receive an email alert reminding you to approve that action.”
Here’s what this means: if you have an email to send via your workflow but want to customize it first, you can if you check the “Approve Before Sending” box.
Start with a simple workflow
Knowing where to start when it comes to creating workflows in Dubsado can be tricky. As a designer, it can be even trickier because you have multiple services. Clients don’t always choose the service that you think would be best for them. Or when prospects first fill out your contact form they’re really just looking for more information and aren’t sure what service they’ll need because they’re looking for your expert opinion. In that case, you’re better off with a generic workflow that will serve all leads and let them know who you are, how you can work together, and give them the next steps to book with you.
Unless your services are very clear cut and a lead comes to you knowing exactly what they want, they’re going to need you to guide them through the process. As a designer, you probably have multiple offers, of which there could be tiers which all have pros and cons (and of course, price differences). The problem is, leads often have a vague idea of what they need and don’t yet understand all of what you offer and the value. Which is why you will be better off asking clear, but open-ended questions on your contact form and not pigeon-holing them into one service right off the bat.
You want to guide them through the process and direct them to the service that you believe would be best for them after learning more about their needs.
What should the workflow look like?
Once you get a new lead, you want to have the option to decline the lead or accept them. In this first step, you’ll want to be able to send a new lead a short introduction email letting them know 3 things.
Here are the 3 things you’ll tell potential clients:
- You received their inquiry and they are a good fit (so far)
- A link to your Intro Packet to review your services, who you are, how you communicate, FAQs, and next steps.
- The next step: schedule a consultation call with you
Using Dubsado’s “Approve Before Sending” option, you’ll get a notification as soon as a new lead arrives before this email goes out. This will allow you to review their contact form and see if you even want to hop on a consultation call with them.
If they are not a good fit based on the information they provided, archive the workflow (so they don’t get any other emails from you) and manually send them an email letting them know you don’t believe they’d be a good fit. Then you can archive the lead and keep on doin’ what you do.
If they are a good fit, before approving the first email, you edit the content of the email so that it’s more personal or you can simply approve the email and wait for them to schedule a call. By checking that one little “Approve Before Sending” box, you’re allowing automation to still happen and giving yourself the ability to customize each email that goes out if you’d like.
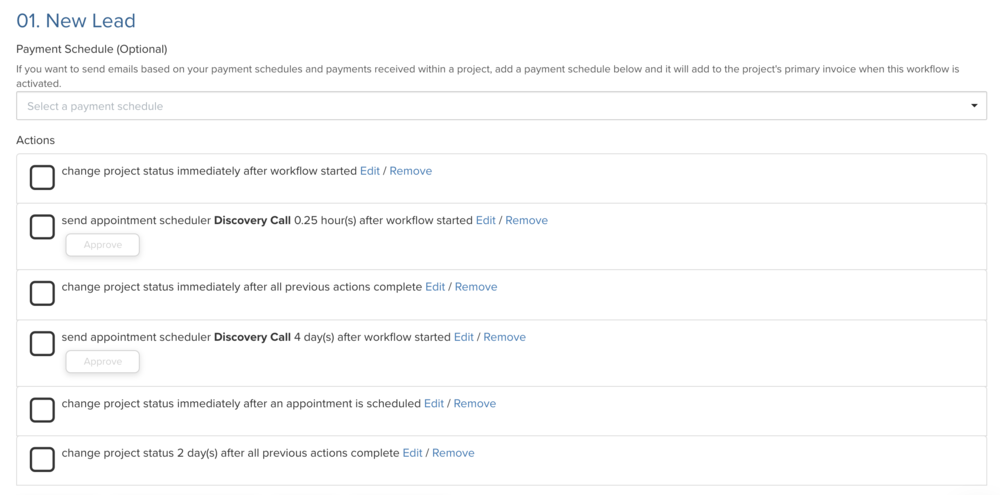
Here’s what your new lead workflow would look like in Dubsado:
- New lead gets in touch via contact form
- Dubsado workflow turns on
- Project status changes to New Lead immediately after workflow starts
- Send appointment scheduler Discovery Call X amount of time after workflow starts **approve before sending**
- Send appointment scheduler Discovery Call X amount of time after workflow starts **approve before sending** (this is to follow up if a lead doesn’t schedule a call yet)
- Project status changes to Call Scheduled after lead schedules a discovery call
- Project status changes to Cold Lead X days after appointment not scheduled
From here you can either end the workflow or add more steps like sending a proposal or creating a task for yourself.
Wrapping it up
Using this short and sweet workflow you’ll be able to semi-automate your initial contact with any lead you receive via Dubsado helping you save time and show your prospects how you deliver high-touch service. This mini workflow is one I use myself and have setup for my OBM clients. Having a short workflow allows you to keep your communication with clients high-touch while also partially automated.
Thanks for this!! I have implemented until my other workflows are nailed :o)
Whoop whoop! You’re so welcome! Let me know if there’s any other workflows you’d like to learn about/ swipe 😉